When trying to figure out how to actually set the thinker blinker up, the creators specified that they "uploaded the Firmata sketch to an Arduino, then wrote JavaScript code to drive the bulb, using Johnny-five to communicate with it."

I then began to search on how to set this Johnny-five up. To understand more about what it is and how to use it, I stumble across this article. But the point I want to share is this.

I then began to search on how to set this Johnny-five up. To understand more about what it is and how to use it, I stumble across this article. But the point I want to share is this.
Julian Gautier then implemented the Firmata protocol, a protocol used to access microcontrollers like Arduinos via software on a computer, using JavaScript in his Node.js Firmata library.
Rick Waldron took it a massive step further. Using the Firmata library as a building block, he created a whole JavaScript Robotics and IoT programming framework called Johnny-Five. The Johnny-Five framework makes controlling everything from LEDs to various types of sensors relatively simple and painfree. This is what many NodeBots now use to achieve some very impressive feats!I also searched for a simple tutorial on how to use these 'Johnny-five' with an Arduino and found this video by the channel MakeUseOf that explains the step by step on how to install the Johnny-five to your computer. Basically, the part that I followed for my own project is setting up your computer with the Johnny-five library.
- The first thing you need to do is set up node.js. If you don't have node.js, go to this link to download it. Then pick the 'Recommended For Most Users' option, and install it. (Note: make sure when installing node.js, on the custom setup, that the 'Add to Path' options are there)
- Once it's done installing, open your command prompt. To make sure your node.js is 'readable', type in "npm init", then continue pressing enter 'Is this OK? (Yes)' line comes out. Then press enter.
- Next, type in the line "npm install johnny-five". This is the line to actually install the johnny-five.
- The video also recommends us to install keypress beforehand to avoid any problems when doing your experiment, just in case. What keypress does is allowing to control your projects with the help of pressing keyboard buttons. To install it, just type in the line "npm install keypress".
After following the steps, you are basically done with installing it. However, when you want to try an experiment, make sure that your js is saved under the same folder as where your node.js is.
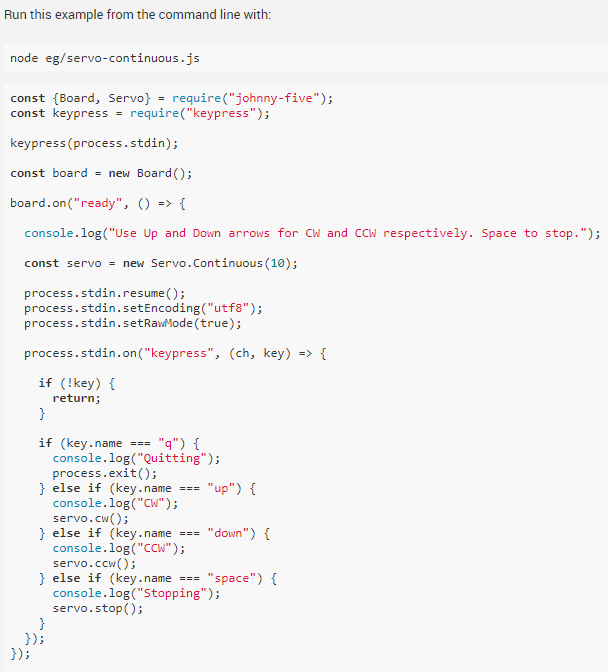
- After picking on which experiment you want to try out (the video uses this code as an example). Copy the codes to Notepad++ or Sublime to be able to read your codes more clearly.

- In the tutorial video, the const is replaced with the word var, which stands for variables. Inserting the first two lines, it means that we are telling the code to include the johnny-five and keypress library when activating this project.
- Now see the fourth line of the code, which says "const board = new Board();". MakeUseOf says that this line is to indicate with Port your Arduino is connected to (you can check it from your PC's device manager). Basically, this step is to help you if the javascript you're going to try out on your command prompt couldn't figure out which port your Arduino is on. By inserting the COM number to it. (Note: The var you see on the picture, is what this list's no. 2 is explaining, so don't be confused).

- Then, save your javascript under the same folder as to where your Command Prompt reads (by default, the location is C:\Users\(your Window's profile).
- Open your Command Prompt, then just type in "node (name of your javascript without it's extension). For example, if you save your js file as Servo21.js, then type in "node servo21" on the command prompt. Then just press enter. This will transfer the command to your Arduino board and the experiment should be happening.

Comments
Post a Comment